It's the 10th of the month so time for another Fully Finished Gallery SAL; the final one of 2019!

This is the place which will hopefully encourage you to fully-finish off one or more of your cross stitching projects which may have been recently completed or sitting in a bag or box or cupboard or drawer etc. for months or years, neglected and not out on display as it/they should be.
The link-up for this SAL opens on the 10th of each month and stays open for 10 days, so you have plenty of time to turn those UFOs into FFOs and join in.
So, what have I been up to this past month? Well, some finishes using my usual techniques and one finish trying a slightly different technique:
So, what have I been up to this past month? Well, some finishes using my usual techniques and one finish trying a slightly different technique:
1) Winter Bird was one of my Summer Of New Starts and the last of the four seasonal birds to be finished. He's fully-finished with matching fabric and coordinating barley twist cord:


I said I'd show the birds together when they were all fully-finished, so here they are. Autumn and Winter are obvious, I think, but Summer and Spring could be interchangeable:

2) Blue Patchwork Hootie was my September Smalls SAL piece. He's been finished off to match the other patchwork hooties, again with matching fabric and cord. I was supposed to adjust the squint in his left eye but picked him up to FFO and totally forgot about it. Oh well, he doesn't look too sinister!


3) RIP Spooky Hootie was my October Smalls SAL piece and FFOd using a new-to-me simple but effective technique. He's basically sandwiched with some wadding in a frame made from thick black card covered in sparkly black felt. The hanging loop is black and purple organza ribbon, and the orange ric-rac just adds that little extra something I think. I love the way he's turned out, although perhaps thinner ribbon would have looked better:


4) Finally, this month's birthstone, December In Turquoise, was finished off in the usual way:


The tutorial for this technique is at the end of the post but, in the meantime, here are all of the months together, all with different patterns of beads around the outside and all with different patterned backing fabrics. They're almost as colourful as Joseph's Coat. Not bad, eh?

Now it's over to you to show what you've been finishing this month.
Please link-up using the URL of your FFG SAL post and not the home page of your blog, adding a thumbnail of a finish and either your name or your blog name as the caption. The link-up will remain open for 10 days, closing at 6am UK time on 20th December.
And please don't forget to follow other links and see what fellow fully-finishers have been up to; you never know, other projects may give you an idea for your next finish!
Once the link-up has closed I shall update the FFG SAL 2019 page with the number of entrants and entries.
NEW LOGO FOR 2020
Any ideas? I'm totally open to suggestions, or if you want to design one.....
PRIZE DRAWS (yes, two!)
Once this SAL has closed on 20th December I will be doing two prize draws for you FFO'ers!
1) For each month you entered, your name will receive one entry into the draw. Numbers will be allocated as entries were received.
2) For each FFO entered, that FFO will be allocated a number, again in the order in which the entries were received.
Both sets of numbers will be plugged into an RGN and two winners chosen (my name and FFOs will obviously not count!)
The winning names will be posted on 21st December. The second half of December is going to be a busy posting month for me so please keep your eyes peeled for that particular post as it will be up to you to contact me!
Now, I haven't thought of the prizes yet so suggestions are welcome. I would like the prize to be FFO related, if possible, but it's not essential so I could offer something like a generic gift certificate, or perhaps the winners might like to choose something specific. Our individual tastes can vary so much so I'm open to negotiation!
TUTORIAL FOR FFOing THE BIRTHSTONES
Now, as promised I will show you how I finish my monthly birthstones. Over the months I've made little tweaks which generally involve cheating but which give an overall better finish. I also use a lot of tape (a habit from my scrapbooking days) but can assure you I do not have shares in the company! I've probably included far too many steps and photos, but better that than not enough. If you're not as fussy as me, some of the steps can be missed and, of course fabric glue can replace the tape if that's what you're more comfortable using.
These are my supplies. The red tape is ultra high-tack tape and is actually clear; it's just the backing that's red.

1a) Iron the project face down and attach interfacing to the back to cover the stitching only. This is important because the tape won't stick to interfacing as well as it does to the fabric.
1b) Cut a piece of wadding the same size as the interfacing. Wadding is not essential but does give a bit of depth to the finish.
1c) Cut a piece of card to the size you require the project to be. I leave 1/4 inch around the design but you might want to leave more or less.
1d) Stick narrow tape around the outside of the card.

2a) Place the wadding onto the stitching.
2b) Remove the backing from the tape and place the card face down onto the stitching. Once in the correct place (I use pins to mark the four corners) firmly press into place. Don't worry, the tape doesn't show through the fabric. If strong enough tape is used, the fabric will stick to the card to give a 'flat' border around the edge of the 'puffed' stitching.


3a) Attach four pieces of tape to the four corners of the back of the card. You may want to trim the fabric down first. I've left 1/2 inch here and that's about right for this size of project.
3b) Stick the corners down. I use diagonal corners, as it's my preferred method, but you may wish to do square corners, or even cut the fabric away. I don't think diagonal corners are the neatest but I don't want to cut the corners. Anyway, they're covered up with ribbon later!

4a) Once the four corners have been stuck down, attach tape to the lengths of the card and stick the sides down, keeping the fabric in shape by using the holes as guidelines. The corners may seem a bit bulky which is why you may prefer to cut at least some of the fabric away.

5a) Cut enough ribbon for the corners (I use 2" for each corner) and stick tape to the back.
5b) Cut the ribbon into four equal pieces (it's easier to attach the tape to one long piece of ribbon than to four small pieces).
5c) Attach to the front of each corner and wrap around to stick to the back.


That's the top bit done, now for the bottom.
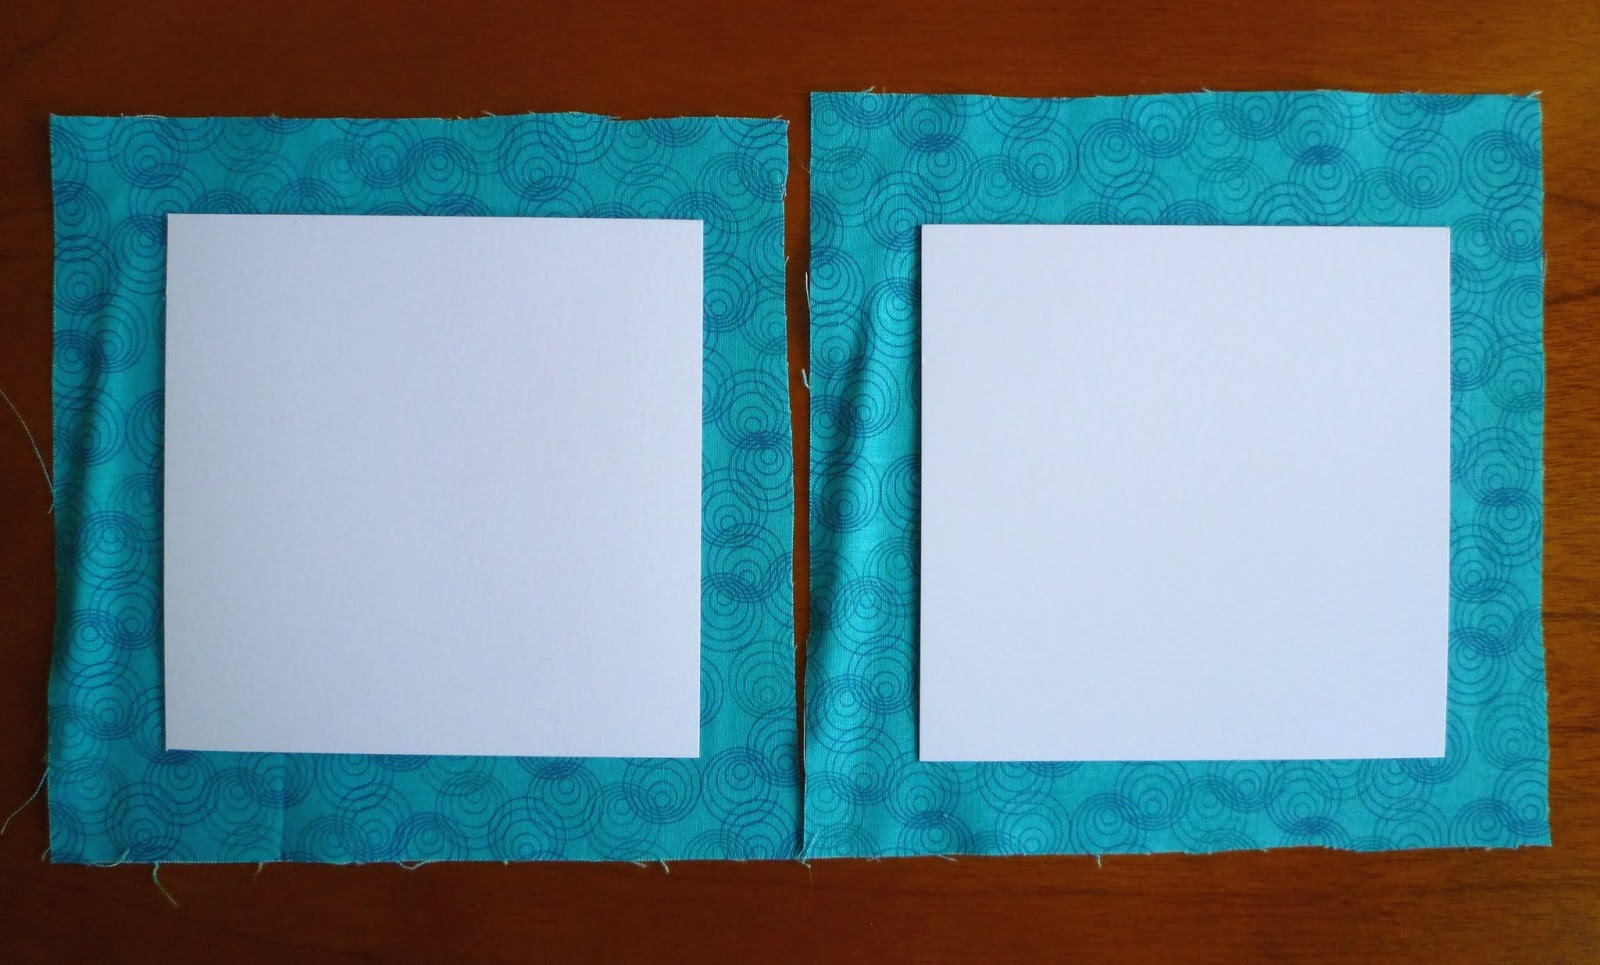
6a) Depending on how much of the backing fabric you want showing behind the stitched piece, cut two pieces of card to the required size.
6b) Cut two pieces of fabric larger than the card. Ensure the fabric has been ironed to remove creases and fold marks as you can't iron it later.

7a) Attach thin tape around the outer edges of the card.


The tutorial for this technique is at the end of the post but, in the meantime, here are all of the months together, all with different patterns of beads around the outside and all with different patterned backing fabrics. They're almost as colourful as Joseph's Coat. Not bad, eh?

Garnet, Amethyst, Aquamarine, Diamond
Emerald, Alexandrite, Ruby, Peridot
Sapphire, Tourmaline, Topaz, Turquoise
Now it's over to you to show what you've been finishing this month.
Please link-up using the URL of your FFG SAL post and not the home page of your blog, adding a thumbnail of a finish and either your name or your blog name as the caption. The link-up will remain open for 10 days, closing at 6am UK time on 20th December.
Mister Linky's Magical Widgets -- Thumb-Linky widget will appear right here!
This preview will disappear when the widget is displayed on your site.
If this widget does not appear, click here to display it.
This preview will disappear when the widget is displayed on your site.
If this widget does not appear, click here to display it.
And please don't forget to follow other links and see what fellow fully-finishers have been up to; you never know, other projects may give you an idea for your next finish!
Once the link-up has closed I shall update the FFG SAL 2019 page with the number of entrants and entries.
NEW LOGO FOR 2020
Any ideas? I'm totally open to suggestions, or if you want to design one.....
PRIZE DRAWS (yes, two!)
Once this SAL has closed on 20th December I will be doing two prize draws for you FFO'ers!
1) For each month you entered, your name will receive one entry into the draw. Numbers will be allocated as entries were received.
2) For each FFO entered, that FFO will be allocated a number, again in the order in which the entries were received.
Both sets of numbers will be plugged into an RGN and two winners chosen (my name and FFOs will obviously not count!)
The winning names will be posted on 21st December. The second half of December is going to be a busy posting month for me so please keep your eyes peeled for that particular post as it will be up to you to contact me!
TUTORIAL FOR FFOing THE BIRTHSTONES
Now, as promised I will show you how I finish my monthly birthstones. Over the months I've made little tweaks which generally involve cheating but which give an overall better finish. I also use a lot of tape (a habit from my scrapbooking days) but can assure you I do not have shares in the company! I've probably included far too many steps and photos, but better that than not enough. If you're not as fussy as me, some of the steps can be missed and, of course fabric glue can replace the tape if that's what you're more comfortable using.
These are my supplies. The red tape is ultra high-tack tape and is actually clear; it's just the backing that's red.

1a) Iron the project face down and attach interfacing to the back to cover the stitching only. This is important because the tape won't stick to interfacing as well as it does to the fabric.
1b) Cut a piece of wadding the same size as the interfacing. Wadding is not essential but does give a bit of depth to the finish.
1c) Cut a piece of card to the size you require the project to be. I leave 1/4 inch around the design but you might want to leave more or less.
1d) Stick narrow tape around the outside of the card.

2a) Place the wadding onto the stitching.
2b) Remove the backing from the tape and place the card face down onto the stitching. Once in the correct place (I use pins to mark the four corners) firmly press into place. Don't worry, the tape doesn't show through the fabric. If strong enough tape is used, the fabric will stick to the card to give a 'flat' border around the edge of the 'puffed' stitching.


3a) Attach four pieces of tape to the four corners of the back of the card. You may want to trim the fabric down first. I've left 1/2 inch here and that's about right for this size of project.
3b) Stick the corners down. I use diagonal corners, as it's my preferred method, but you may wish to do square corners, or even cut the fabric away. I don't think diagonal corners are the neatest but I don't want to cut the corners. Anyway, they're covered up with ribbon later!

4a) Once the four corners have been stuck down, attach tape to the lengths of the card and stick the sides down, keeping the fabric in shape by using the holes as guidelines. The corners may seem a bit bulky which is why you may prefer to cut at least some of the fabric away.

5a) Cut enough ribbon for the corners (I use 2" for each corner) and stick tape to the back.
5b) Cut the ribbon into four equal pieces (it's easier to attach the tape to one long piece of ribbon than to four small pieces).
5c) Attach to the front of each corner and wrap around to stick to the back.


That's the top bit done, now for the bottom.
6a) Depending on how much of the backing fabric you want showing behind the stitched piece, cut two pieces of card to the required size.
6b) Cut two pieces of fabric larger than the card. Ensure the fabric has been ironed to remove creases and fold marks as you can't iron it later.
7a) Attach thin tape around the outer edges of the card.

8a) Using the warp and weft threads as guidelines (because I've found most material is slightly twisted) stick the fabric to the card. I like to attach the top first, then pull the fabric tight and attach to the bottom. The sides can then be pulled quite tightly and should (but not always) fall into alignment.
8b) Trim the fabric, cutting the corners off diagonally, but not too close to the edge.

9) Put tape on the back of the card and stick down the excess fabric, tucking in the corners first. You can miss out attaching the fabric to the front of the card but I found it much more difficult to get an overall neat and taut finish by sticking it to only the back of the card.

10a) Now add strong tape to the back of one of the cards.
10b) Cut a length of ribbon for the hanging loop to the required length and attach to the tape. I like the ends of my hanging loops in the middle but each end could be spaced as far apart as you like.
10c) Now stick the two pieces of card together, taking care to line them up squarely.

11) FINALLY, add tape to the back of the stitched piece and stick to whichever piece of fabric you want to be the front. I always place mine in the middle but it doesn't have to be.


I hope you found that useful. It is a bit long-winded and fiddly, but the end result is worth it, I think. If there's anything you want clarifying just ask! By the way, because of my faffing around with tape, and ensuring the fabric is lined up squarely, these take about 90 minutes to make.
The whole point of these birthstone ornies reversible is that if I find another suitably-sized birthstone chart I can add it to the other side (as if that's ever going to happen!) However, if I'd thought ahead, I could have made February the back of January, April the back of March, and so on, and saved half the fabric and quite a bit of time. Oh well!
If you've made it to the end here, it just remains for me to say that next month's post will go live on 10th January at 6am UK time. Keep FFOing and let's see if we can make 2020 just as, if not more, successful than 2019!
Take care,


12) Done!

I hope you found that useful. It is a bit long-winded and fiddly, but the end result is worth it, I think. If there's anything you want clarifying just ask! By the way, because of my faffing around with tape, and ensuring the fabric is lined up squarely, these take about 90 minutes to make.
The whole point of these birthstone ornies reversible is that if I find another suitably-sized birthstone chart I can add it to the other side (as if that's ever going to happen!) However, if I'd thought ahead, I could have made February the back of January, April the back of March, and so on, and saved half the fabric and quite a bit of time. Oh well!
If you've made it to the end here, it just remains for me to say that next month's post will go live on 10th January at 6am UK time. Keep FFOing and let's see if we can make 2020 just as, if not more, successful than 2019!
Take care,
Rachel x
10 comments:
Some nice finish finishes this month. I enjoyed seeing your Seasonal Birds and Birthstones all together! Thanks for the tutorial, too.
Thanks for sharing your awesome tutorial. No such thing as explaining these type of things too clearly. I could really follow along so thanks. Something I'll have to try sometime. I'm all linked up. I'm glad you are going to continue the FFG SAL. I sure need it! Sorry I can't help with the image. I'm sure someone can though.
Oops forgot to say I loved your finishes too. They all turned out perfect. Love seeing the whole sets together. The owl fabric is adorable!
Thanks so much for posting the tutorial on your birthstone month finishes. It's so easy to follow along. As you know, I've enjoyed joining in each month and it really pushed me to finish as I went along. Thanks so much for your hosting and your stitchy friendship.
Those Hooties are so cute and the backing fabric is perfect. The Birthstones turned out to be a super cute set!
Thanks for the tutorial!
I've uploaded my final two finishes for 2019. THANK YOU Rachel for this Gallery as it's kept me on track for all of 2019. I had a total of 70 fully finished stitching this year. I've even finished some that were in my box for a couple of years. I still have some in there, so I look forward to next year!
Fantastic work! I love all the Birthstones shown together, you can really see the variety in colours and designs.
The tutorial was great too, very easy to follow. I use double-sided tape a lot too.
I did a handy recap of the year on my post. It seems that scrapbook finishes won the day!
For the logo next year - you could choose your favourite finish that your winner submitted and add the words to that photo. Like I do with my GG Logo.
I actually made my finish in time this month...now I just need to make the post!
Your finishes look wonderful. Bonus points for two finished sets! I also like the new finishing technique you used on the Hootie - it looks very simple, yet effective.
Thanks for the tutorial - I might try it out soon!
Oh the birthstones and birds look great together! Thank you for the tutorial for FFO - I have a couple of small pieces that I am now inspired to try this with x
So many fabulous finishes! I really like how all the birthstones look, so many beautiful colours.
Great tutorial, thanks for sharing. I hope it comes in handy for me soon!
I'm going to try and join in next year, there's always something that needs finishing.
Post a Comment